EC-Manual
This document will explain the terms and definitions as well as the toolbar buttons. Be aware that we are no die-hard architects and that language diferences have pushed us into making choices how to define certain aspects of a window frame.
Terms and Definitions explained... (click on the images to zoom)
 |
A frame is where it all starts with and contains stiles and rails. Frame Height Rail Stile Filling Frame Width |
 |
Ongoing stile means: the vertical bar will be the pricipal one when a joint is found. (In the image the left bottom joint) Ongoing rail means: the horizontal bar will be the principal one when a joint is found. (In the image the right joint) |
 |
In a frame you can place fillings. Window Door Glass Slider window Panel Rackwork |
 |
Recessed distance Stile size Frame depth Rail size |
3dWindow Toolbars explained
The 3dWindow toolbars can be used horizontally, vertically and be embedded with your other toolbar(s) in the Windows versions of SketchUp. For MAC users the toolbars will remain vertical (but you could insert the most used buttons also into the default toolbar).
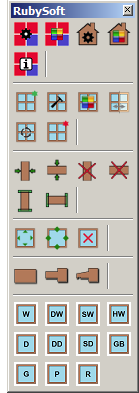
The toolbar will never show all buttons 'enabled' and therefore in 'full color' though! The image has been manipulated to show all possibilities.
Only the icons that can be used at the state your model is in, will be in color and ready to be used.
For example row 8: these three icons represent the level of detail of the frame or filling. If it is in LOW level of detail (the left square wooden icon) you will see the MEDIUM and HIGH level icons lighten up expressing that you can switch to that state of the object. The left icon will be grey since the object cannot move to a state it is already in.)
Function and meaning of the icons
| ICON | FUNCTION |
| With this button you can set general default values which will be available for all of your existing and future models. | |
| With this button you can set default color values which will be available for all of your existing and future models. | |
| Project settings are used to define your settings to be used in this model only. | |
| Project color settings are used to define your color settings to be used in this model only. | |
| The referral to this online web page. | |
| If you want to place a window or door frame without first drawing the square or rectangle area to define the exact measures and location of the frame, you can select this button. It will generate a default frame (with sizes that are predefined in the General Preferences) which then will stick to your mouse pointer and can be placed in a wall or surface with a single click. The exact measurements and other details can be altered afterwards. | |
| When you have created a rectangle or square on a surface and you have selected that area (so SketchUp marks the area) you can click this button to used the location and measurements. A windows will pop-up where you can define your specific needs. It will generally provide you with your predefined Project Preferences or even General Preferences if given. | |
| This button will offer you the possibility to change the settings of an existing frame (when selected). The menu contains the same parameters as if you were to create a new frame. | |
| This button will offer you the possibility to change the colors of the selected frame (and therefore overruling the Project or General Color preferences). | |
| This option will mirror your frame. A window on the right side will be moved to the left and vice versa. | |
| Whenever you find a frame to appear like it changed inside/out or outside/in, you can change the front size with this button. | |
| This will delete the frame (and all additional components and or fillings that you have created). | |
| You can change the width or height of any individual stile by choosing this option and entering the new measurement. | |
| You can change the width or height of any individual rail by choosing this option and entering the new measurement. | |
| This will delete the selected individual stile. | |
| This will delete the selected individual rail. | |
| This function will enable you to change the way the connection endpoints of stiles are handled. | |
| This function will enable you to change the way the connection endpoints of rails are handled. | |
| This function will change the measurements of a filling (therefore moving rails and stiles). | |
| This function will change the status of rails and siles surrounding a filling. | |
| This will delete the filling in a frame. | |
| This will present the complete window frame in a low level of detail. | |
| This will present the complete window frame in a medium level of detail. | |
| This will present the complete window frame in a high level of detail. | |
| This will open a library of Windows. | |
| This will open a library of Double Windows. | |
| This will open a library of Slider Windows. | |
| This will open a library of Hung Windows. | |
| This will open a library of Doors. | |
| This will open a library of Double Doors. | |
| This will open a library of Slider Doors. | |
| This will open a library of Glazing Beads. | |
| This will open a library of Glass types. | |
| This will open a library of Panels. | |
| This will open a library of Rack works. |